Friday, 8 March 2019

The Spare Room and Main Bathroom


 Let's step through the hall doorway ... it's time for a quick tour of two of the rooms in the other half of the van.


To our left we have the little twin bedded 'spare room'.

 Just the width of two 2' 3" wide beds and a 9" bedside table, so just a smidge over five foot wide.  Not much space but planned out well enough for a couple of guests to sleep overnight if necessary, and perhaps in time ... to be turned into an office rather than a bedroom, we'll see.


There's a small wardrobe with a hanging rail and a shelf, currently storing the little rechargeable vacuum cleaner and broom ... but ready for action if we need it.

The room is finished off with a mirror and a little shelf over the radiator ... handy for storing teddy bears.


Directly opposite the spare room on the other side of the corridor is the main shower room.  

I don't know how estate agents manage to take photos in such small spaces ... because I really struggled!!  As you can see there is the heated towel rail/radiator to the left.


There are lots of shelves for towels and toiletries and a cupboard below for storing things you don't want on show or to get dusty.  The cupboard to the left houses the gas combi boiler,  which provides heating and instant hot water to the van and runs off bottled Calor Gas.


And then the other side of the small room is the full width shower ... truly the best shower I have ever used.  I'm usually a bath person, but this shower has me fully converted.

I'll be back on Sunday with the final part of the Van Tour.

See you then


Sue xx

Thursday, 7 March 2019

The Dining Room


Now it's time for the final 'room' of the living space ... the Dining Room.

Just a table, four chairs and a little wall cupboard which to be honest is neither use nor ornament.  It looks ridiculous if I leave it empty,  and to me a bit cluttered if I put things on it.  BUT, and yes it's a big BUT ... if I leave it with less on it will acquire clutter, so I try to set it out in an eye pleasing fashion.


I guess the little cupboards hide a multitude of sins, and are at least handy for hiding the keys to various places in.


My little drawers from Poundland are  handy addition to keep batteries etc from rolling out when the door is opened.


The table always looks like this ... I like to keep it set up ready for a dinner party. 


Haha ... yeah right ...


... this morning it looked like this.

This is real life not Instagram!!


The picture under the wall cupboard is my Jack Monroe artwork, from the 'Cooking on a Bootstrap' books Kickstarter plan.  I thought the grey frame and the monochrome words and images fitted the Van perfectly.   I shall bring her other 'Parsnips' picture here too one day.


Suky says "is this a shopping bag Mum?"

I say no ... it's my mobile office.


So, no food then!!  😔


And here we are back in office mode ... but tidier.

It was good to get all the crockery and glassware out for the photo earlier though as it gave me chance to wipe out the cupboards 🙂

We usually eat at the table at breakfast time, but tend to have lunches or other meals over in the living room.  I love eating out of bowls rather than plates as I'm a real pasta lover these days, and no matter what anyone says I like to eat in front of the television.

So that's the living end of the van thoroughly dissected.

Tomorrow a whizz through the remaining rooms.

See you then.

Sue xx

Wednesday, 6 March 2019

The Living Room


I'm breaking these posts down into 'rooms' to make it easier to fit in and describe each living area of the Van, but I was having a bit of a laugh about it yesterday while walking Suky along the riverbank because you'll have realised of course that it's all open plan and therefore just one large 'room'.

As I think I've mentioned before the Van is 36 foot long and 12 foot wide, a total of 432 square feet of living space.  This is divided equally into two halves, so 18 foot of open plan living, kitchen and dining room space and the other half being made up of the main bedroom with en-suite toilet and basin, the twin bedded room and the shower room.

Today I'll show you what there is up to now of the living room, I'm just about to unpack the books and bits and bobs that we left here stowed under the bed over Winter, which will make it feel ... and look ... a lot more like home.

As you can see in the top photo there is a fireplace with an electric 'coal effect' fire, this is lovely as a quick warm up if we've been out and the heating is off.  But we don't use it much as the van really is very warm with the full central heating system heating radiators in every room.

Next to it on a matching unit is the television that my son Simon gave us when he upgraded via the local cheap selling pages and managed to get himself a huge, blokey model for £100.  It runs in the family this money saving mentality, he's a chip off the old block 😉

 We also have a Freeview Play box to give us a wide selection of programmes, and of course a DVD player for me to watch my huge collection of films and boxed sets on rainy days and cosy nights in.


The seating area is in an L shape.

There is a spare fold out double bed under the seats to the left of the picture and lots of storage space under all the others.  The little coffee table matches everything else in the van ... but might be going in the near future when I find something more logical and useful.  There's no rush though, it serves its purpose, it's just annoying walking round it all the time.


One of Suky and Mavis' favourite areas,  the bed they share in front of the full length windows.  They watch the world go by and growl at passing dogs ... it passes the time between snoozes, meals and doggy walks.


My television watching and cosy reading corner, with Suky's little doggy mat for her to snuggle up on when Mum finally sits still in one place and it's time to relax.  Her little mat comes through to the bedroom at bedtime when it's just the two of us here and she sleeps on it on the bed with me.


And finally the little lady herself waiting to go out.  

She loves it here, mostly because virtually all the local shops, businesses and cafes allow dogs in ... it's a Pugs idea of heaven going out and about with Mum. 

Sue xx


Tuesday, 5 March 2019

The Kitchen


After the glue on the new shelf had dried I set to with the best bit ... working out what to put where.  I had a few different shelf layouts over the course of the evening while I pondered what I would need handiest and how I would use the space.


Last year the three large storage jars on the lefthand side of the shelf ... containing pasta, porridge oats and granola ... lived at the back of the main food cupboard, meaning that to get to any of them meant an awkward crouch or a kneel down to reach them over the canned goods that they lived behind.  How much easier to have them to hand and yet not clogging up valuable worktop space.

Next to them a jar that is currently empty, but will most likely be filled with red lentils, which as well as being useful and in constant use will add a pop of colour.  Further along to the right is my little egg crate bought during last week's Shopping Hauls Challenge on my other blog.  Behind this and the little biscuit tin on the end of the shelf, is the chopping board that is in almost constant use.

Beneath the shelf, sat in the cube is a jar holding Alan's salted peanuts and cashew nut assortment.  Next along is what is going to be my weekly fresh fruit and veg basket ... I want to shop in a much smaller way and make good use of what I buy, so having most of it on the worktop will mean I see it and hopefully be more inspired to use it.   Then there's the little toaster and finally the drawers which contain some food bags, my little packs of Lotus biscuits and the pegs I use to keep food packs closed.


Last year I decided to utilise the shallow shelf  that's directly above the microwave as a spice rack and it worked really well, so this has remained unchanged.  The jars were four for £2 in Asda and match the larger versions on the shelf which were £2 each.


To the right of the cooker is a small wall cupboard, a slightly wider base unit with a worktop that is just about big enough for making drinks on, and the large fridge freezer.  The fridge is on top and the smaller than it looks freezer is below.   The little freezer drawers are only half the depth of the units as the workings are behind them.

I have an idea for this area ... but first I need to see about getting the fridge freezer taken out and the wall cupboard removed ... it will make the space much more usable and make more sense as this large fridge is too big for our needs here.


A final photo ...  trying out my new worktop space and seeing which of my little stainless steel measuring cups is the right size to hold 50g of oats for my morning porridge, the 'half cup' sized one will now be left in the jar with the oats to simplify breakfast time even more.

Smaller and Simpler ... that's how things are going ♥️


Sue xx


Monday, 4 March 2019

Learning to Live in a Space Before Making Changes


We used to move into a new space and rush to make changes, adding to or taking away what we thought would make things better.  Correcting mistakes further down the line that would end up costing us money and be, well just annoying. 

 So this time we didn't. 

We bought our static caravan brand new, although at the time of purchase it was a two year old design and model (hence us getting a really good deal on it, including a years site fees thrown in).  With this in mind we didn't want to change anything immediately so throughout our first year we used the van exactly as it came

I decided for once to take the time and learn to live in my new surroundings.  And while Alan, like most men, would have been more than happy to leave it exactly as it was permanently, I spent my time watching how we moved around the space, cooked in the kitchen, relaxed in the living room etc. with a view to the changes we would make. 

  I took a mental note of how we used it, what fitted in with how we live, what we loved about it, what annoyed me ... but mostly I noted what would make life easier on a day to day basis.


This was the first change, or addition, that I thought was necessary and that we have just implemented.

The worktop on the left hand side of the cooker was crying out to be more cooking friendly.  We don't eat many ready meals as we like to cook from scratch, and when you're cooking simple foods it's nice to have your ingredients and cooking implements to hand.

And a bit of space to use them.


So we made this.

Or rather I designed it and got the component parts, and Alan made sure it worked and would fit, taking measurements, cutting, trimming and painting wood.

Yes it's simply a piece of wood cut to size, edged with a nice trim then glued on top of a bought wooden cube, both of which were painted white with spray paint.  At the other side ... sitting slightly further back to give maximum preparation room nearer the cooker ... the shelf rests on a simple little drawer unit which cost me £8 from Asda.


It may not seem much but raising some things off the worktop while still being able to utilise ALL the space beneath the shelf will make a world of difference.

The plan is that the toaster will sit underneath the shelf, being pulled out when in use, a jar of something will sit in the open cube and a few more jars of dried goods will be on top of the shelf, providing inspiration for meals and releasing storage space inside the cupboards.

At the moment I'm waiting for the glue to dry so I can't start arranging and rearranging  ... there will be time to play very soon though 😀


Sue xx


Sunday, 3 March 2019

The Outside Space


Today I am introducing you to the outside of my new home.  

We've done a lot of work to the little patch of land that sits to the right of my new home.  With some help from my son Simon, Alan has completely changed the outside space around the van.

Excited to get stuck in.

We took it from this, originally a bare concrete walled garden area.

 The first job was to cover the concrete fencing slabs with trellis panels to soften the look.  Then we were left with the lumpy, bumpy grass and a few paving slabs hastily put in place for the temporarily borrowed steps.


Then Alan and Simon put in a level paved area ready for the installation of decking.  The outline of a corner planting area was planned and a level surface for the siting of a shed was also installed at the back of the grassed area.


Shortly after that the shed was assembled and put in place.  The flower beds to the right of it started to take shape and then the decking was professionally installed.


The grass was levelled and re-turfed, initially a mat was put down to be under the car, but this proved unsuccessful, so it was time to scrap Plan A and put in place Plan B.  

Also, as you can see in this photo, we made use of some left over trellis to soften the outline of the shed and make it blend into the garden in a less obtrusive way.  Plants from home and from the local garden centre were put into the corner flower bed and some metal bits and bobs were hung from the trellis.  Planters were filled with flowering climbers to eventually grow and soften the trellised areas even more and a lovely new bench was made by Alan from oak slats and antique bench ends and was sited on a couple of the leftover paving slabs.


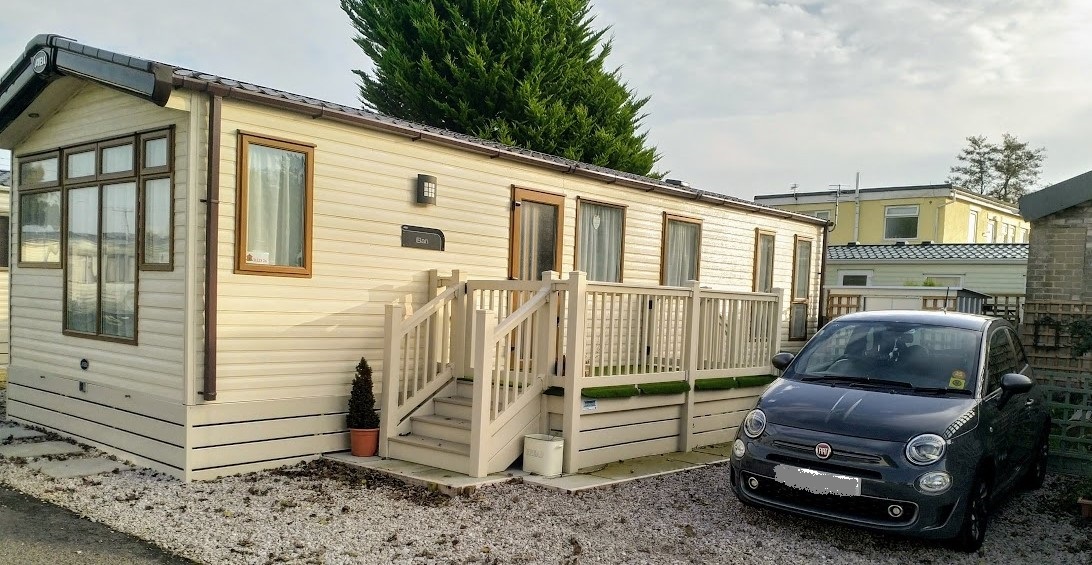
This is the same as the photo at the top of yesterday's post showing the final exterior layout, with all the skirting in place around the base of the van and the decking.  And this is what shows a bit of Plan B,  which was to put up a trellis fence to cut the garden space in half !! 

 The front area is the right size for my car to neatly slot into and the back area is a nice self-contained, much smaller, but nicely secure for the dogs garden space.  The dividing trellis is cleverly held up by the main trellis on the concrete wall panels on one side and is fixed to the decking with simple cable ties at the other.  For stability it is also supported along it's length by planters, made by Alan and painted  by me in our favourite shade of green.  You can perhaps just see it at the right hand side of my car.  I'll take more photos when I show you the actual garden area on another post.

It shrunk the size of the garden to less than half but it gave us good parking for both cars.  Alan's truck fits neatly across the front of my Fiat when we are both in residence.  The decking was altered by the company that installed it originally to give us a set of steps down into the garden as well as  the steps at the front, this means that the dogs can safely go outside whenever the door to the van is open.


And happy dogs mean happy humans.


Sue xx

Friday, 1 March 2019

Home


So this is it - home.

Truly a smaller and simpler life. 

Just a girl, a Pug dog, a small car, a tiny garden and a van ... a caravan ... but she will always be 'the van' for short.
Four hundred and thirty two square feet of living space, plus a small outside decking area.  

Tiny living ... something I have always, always wanted :-)


Set out something like this.

Well almost exactly the same as this except for the en-suite in the main bedroom ... which in my vans case is in the opposite corner. With the tiny en-suite being in the top left corner (as you look into the bedroom from the doorway) and the fitted wardrobe adjacent to it.   I will show you photos of the actual rooms as they are now on a future post.  But I have some changes in mind and things may not stay exactly as they are pictured for long.

I gave a massive clue away almost a year ago, when I published THIS post shortly after starting this blog.  The photo actually showed the brochure photo of the kitchen area of our new second home.  Over the last year we have worked hard remodelling the outside space to make it work for us and the dogs.

And now this is to become my home for the majority of the time. 

 I'll be growing herbs and planting some edibles in the tiny garden, along with the flowers and shrubs we have already put in.  Shopping in the nearby village and nearest towns, and generally taking a step back and away from the hustle, stress and hard work of the last few years.  Self sufficiency on a large scale is not for me.  I don't want to own land, raise animals or hatch birds, I don't want to have so much relying on me ... I feel the weight of the responsibility of all that far too much.

And that I think is it, I don't need much and I don't want much.  I don't want a life of striving to make things work.  I want to take what I've learnt about me, my life over these last few intensive years, about my relationships with others and I want to make things better for me and the people I love.  And when I'm a happier and calmer person that works so much better for everyone.  And most of all I do realise completely that I am married to the most special of men that is willing to allow me to do just that.

And to make things crystal clear, we are not splitting up, we are not divorcing and we are not having a trial separation ... we are simply living the lives we each want to live for a few days each week and getting back together every weekend.  Exactly as we used to do when we first met and for the first few years of our marriage.  To enjoy each others company when we are not busy working at our individual choices and jobs.  Most of the time Suky will be with me and Mavis will be with Alan, as sometimes Mavis and Ginger like to snuggle up at bedtime and it would be cruel to separate them.  And of course we will all be together at weekends.


So come with me through a country gate, to a calmer, smaller and much simpler life.


Sue xx