

Today I am introducing you to the outside of my new home.
We've done a lot of work to the little patch of land that sits to the right of my new home. With some help from my son Simon, Alan has completely changed the outside space around the van.

Excited to get stuck in.
We took it from this, originally a bare concrete walled garden area.
The first job was to cover the concrete fencing slabs with trellis panels to soften the look. Then we were left with the lumpy, bumpy grass and a few paving slabs hastily put in place for the temporarily borrowed steps.

Then Alan and Simon put in a level paved area ready for the installation of decking. The outline of a corner planting area was planned and a level surface for the siting of a shed was also installed at the back of the grassed area.

Shortly after that the shed was assembled and put in place. The flower beds to the right of it started to take shape and then the decking was professionally installed.

The grass was levelled and re-turfed, initially a mat was put down to be under the car, but this proved unsuccessful, so it was time to scrap Plan A and put in place Plan B.
Also, as you can see in this photo, we made use of some left over trellis to soften the outline of the shed and make it blend into the garden in a less obtrusive way. Plants from home and from the local garden centre were put into the corner flower bed and some metal bits and bobs were hung from the trellis. Planters were filled with flowering climbers to eventually grow and soften the trellised areas even more and a lovely new bench was made by Alan from oak slats and antique bench ends and was sited on a couple of the leftover paving slabs.
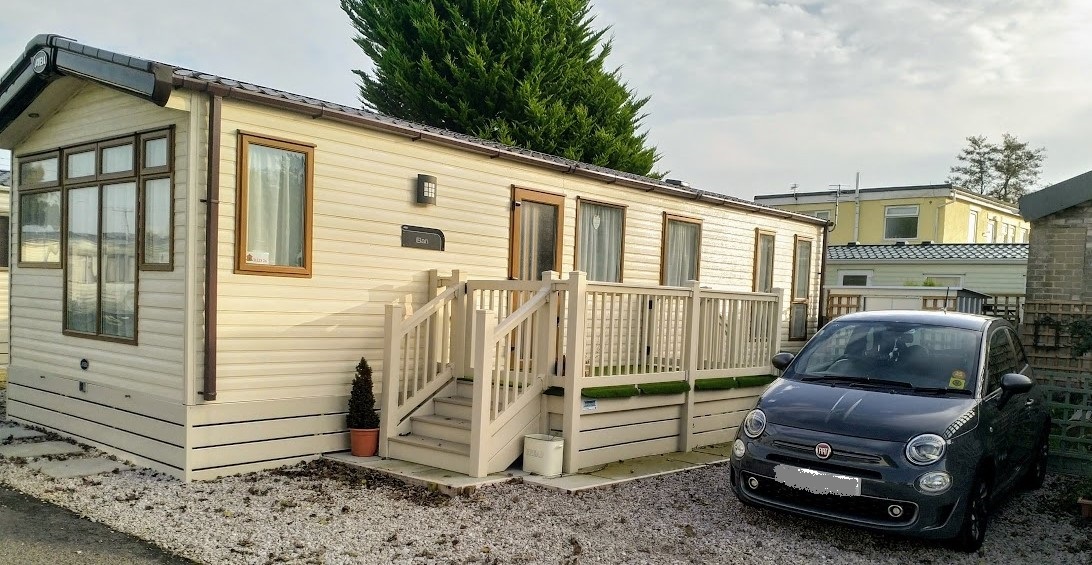
This is the same as the photo at the top of yesterday's post showing the final exterior layout, with all the skirting in place around the base of the van and the decking. And this is what shows a bit of Plan B, which was to put up a trellis fence to cut the garden space in half !!
The front area is the right size for my car to neatly slot into and the back area is a nice self-contained, much smaller, but nicely secure for the dogs garden space. The dividing trellis is cleverly held up by the main trellis on the concrete wall panels on one side and is fixed to the decking with simple cable ties at the other. For stability it is also supported along it's length by planters, made by Alan and painted by me in our favourite shade of green. You can perhaps just see it at the right hand side of my car. I'll take more photos when I show you the actual garden area on another post.
It shrunk the size of the garden to less than half but it gave us good parking for both cars. Alan's truck fits neatly across the front of my Fiat when we are both in residence. The decking was altered by the company that installed it originally to give us a set of steps down into the garden as well as the steps at the front, this means that the dogs can safely go outside whenever the door to the van is open.

And happy dogs mean happy humans.
Sue xx
Sue it looks fabulous, you have a very clever man....well, couple of men! Alan's bench is beautiful, how talented is he!
ReplyDeleteWe're getting better at designing and executing the plans we come up with, sometimes we have a bit of a tweak to make as in this case ... but we get there in the end.
DeleteVery clever use of limited space, well done all of you. It looks beautifully homey and comfortable.
ReplyDeletexx
I'll show the other side of the garden once we tidied it up a bit. Well I can do a 'before' and 'after' 🙂
DeleteSo thoughtfully planned Sue and it really looks lovely - the pug is the last embellishment but the most loved bit I expect (I love pugs). I hope you will be very happy here.
ReplyDeleteSuky loves her vantage point on the deck ... warning all passersby that a ferocious dog lives here 😉 Thank you for your good wishes. Xx
DeleteWhat an adventure, do so love the concept of 'tiny' living, and your small patch of garden has been beautifully made.
ReplyDeleteI love all things tiny 🙂 It will be nice to get a few edibles growing out there in soon. I do already have some Spring Onions that I put in last year and they are still doing well.
DeleteWhat an adventure-I loved my caravan for 35 years and now in our second season of motorhoming. I know yours is a proper home but I never weary if we are in the van-it’s my other home and I love being in the smaller space. I hope you will show us some of the inside as well. You are such a hard working family to have done all this work so quickly. May you have joy in your new home.
ReplyDeleteThe start of talking you through the inside will be the next post. Thanks for the good wishes 🙂
DeleteHow far is this from your previous home?
ReplyDeleteTwo hours drive away if you get a straight run with no stops or hold ups. It means when we are here we are that much closer to family.
DeleteIt looks lovely!! You've done a lot of work to the place, let the adventures begin!!
ReplyDeleteThank you 🙂 Adventures, new discoveries and a whole new life here I come 😁
DeleteThat garden has undergone a transformation. I am looking forward to seeing some of the inside.
ReplyDeleteWe've taken it from the worst pitch on the site to one of the best. There have been a lot of compliments, and it meant we got to know people very quickly as our work was watched and commented on every step of the way as people stopped to talk 🙂
DeleteFabulous use of the limited space, have you thought of growing strawberries, tomatoes etc in containers from the trellis. Well done to you all, is it a 52 week site Sue? xx
ReplyDeleteAt the moment we have Clematis, Jasmine and lots of ivy growing in the planters at the base of the trellis. The plan is to cover and scent the area as much as possible as we are right next to the communal bins. We were concerned that maybe on a hot day it would be a bit smelly, but even through the heat of last Summer there was no odour.
DeleteIt is a forty week site, closing for December, January and February. This makes it so much cheaper as there is no Council Tax to pay, just a share of the rates.
Sue, night scented stock and sweet peas would make a good addition then. The thing to also do is make sure that the bin lids are closed and not left open especially if they are over filled. We used to have a static van. We go on our first bargain break on the 18th March 4 nights at Thornwick Bay and then 7 nights at Barmston grand total £134 via newspaper offers
DeleteAs I said it turned out we didn't have a problem with the bins after all, even in the really hot dry weather. This year they have doubled the amount of bins so there should be even less chance of any kids being left open because they are full.
DeleteSweetpeas are a good idea though, my Mum loves them and I could take her a bunch now and then 🙂 Enjoy your caravan holidays, those offers are brilliant aren't they.
What a transformation! You have created a cozy, private garden big enough to enjoy and provide with very little future work, other than the usual maintenance. Love it!
ReplyDeleteOnce the veggies in there will be some daily work, but not much. Half an hour a day at most, and maybe the same again watering at night after a hot day (fingers crossed for hot days 🙂).
Delete